ImageChat–Self-hosted Installation Guide
Build and deploy Generative Multimodal AI Vision applications in your own environment to maintain full control over your data.
ImageChat–Self-hosted documentation
Download ImageChat to your local environment and take control of your AI capabilities. Using ImageChat advanced features, you can build and deploy Generative Multimodal AI Vision applications on your own infrastructure, ensuring the highest levels of data privacy and security.
Follow this step-by-step process to install ImageChat, and you will be up and running quickly. Please review the necessary installation prerequisites before beginning. For support during the setup process, contact [email protected].
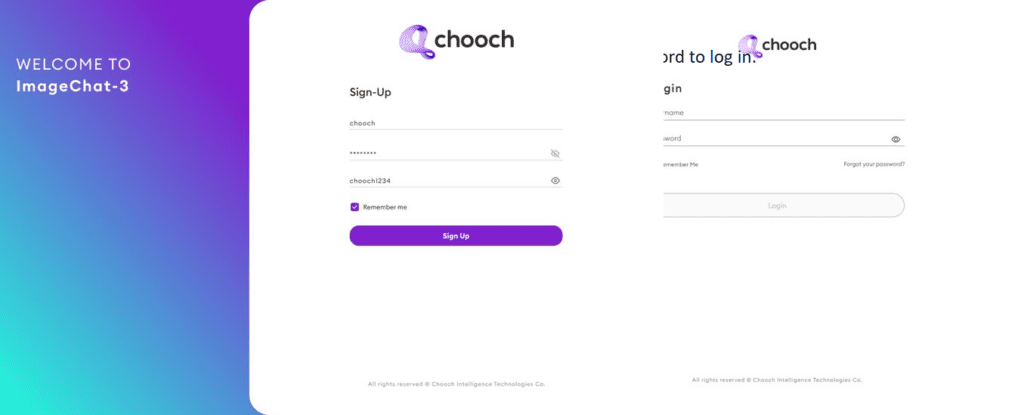
You must have a Chooch account to continue. If you do not have an account, sign up to create a free one.
Software requirements
Please review the following minimum software requirements before installing ImageChat.
| Compatible Operating Systems | Ubuntu ≥ 20.04 LTS |
|---|---|
| Docker Version | 24.0.6 |
| Docker Compose Plugin Version | v2.21.0 |
| GCC Version | 9.4.0 |
| NVIDIA Docker | 2.13.0 |
| NVIDIA Driver | 535.54.03 |
| CUDA Version | 12.2 |
Hardware requirements
Please review the following minimum hardware requirements before installing ImageChat.
| Compatible Graphics Card Platforms | T4, A10, A30, A100 |
|---|---|
| GPU Memory | Min 16 GB |
| Compatible Processors | • 8th to 13th generation Intel® Core™ > i7 (suggested i9)
• 3rd generation Intel® Xeon® Scalable processors |
| Memory | Min 64GB RAM |
| Disk | 256GB SSD Drive |
Installation prerequisites
Please ensure you have reviewed the following pre-requisites before trying to install ImageChat.
Docker Runtime installation
You can skip this step, if Docker is already installed on your system.


curl https://get.docker.com | sh
sudo systemctl --now enable docker
# To add current user to sudo group (for later docker usage without sudo)
sudo /usr/sbin/usermod -aG docker $USER
sudo reboot
Docker Compose plugin installation
Install the Docker Compose plugin. You can skip this step, if Docker Compose plugin is already installed on your system.
sudo apt-get update
sudo apt-get install docker-compose-plugin
docker compose version
NVIDIA Docker installation
You can skip this step, if NVIDIA Docker(v535) is already installed on your system.
. /etc/os-release
export distribution="${ID}${VERSION_ID}"
curl -s -L https://nvidia.github.io/nvidia-docker/gpgkey | sudo apt-key add -
curl -s -L https://nvidia.github.io/nvidia-docker/$distribution/nvidia-docker.list | sudo tee /etc/apt/sources.li
sudo apt-get update
sudo apt-get install -y nvidia-docker2
sudo systemctl restart docker
NVIDIA Driver installation
You can skip this step, if NVIDIA Driver(v535) is already installed on your system.
sudo apt update
sudo apt install nvidia-driver-535
sudo reboot
Installation instructions
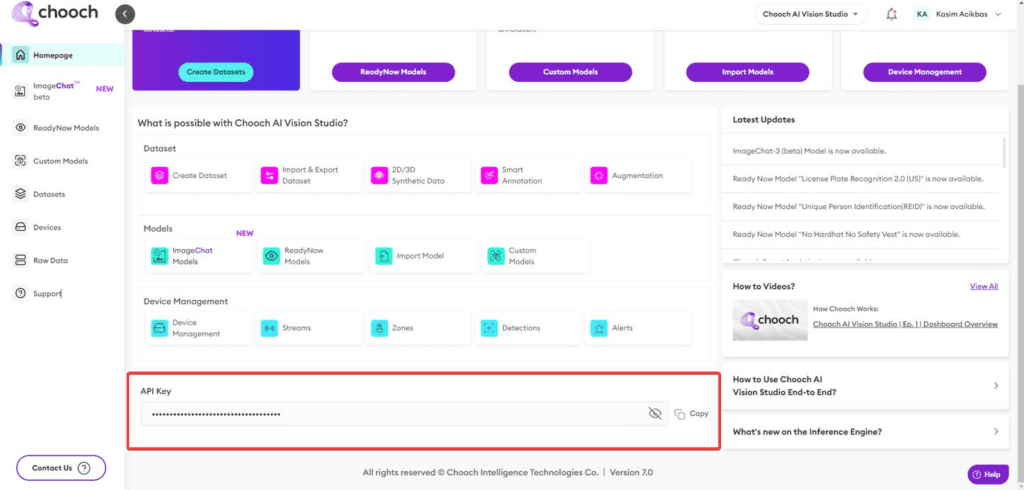
1. Log in to your Chooch account and retrieve your API Key found at the bottom of the homepage.
2. Enter the following script along with your API key into your terminal and follow the instructions.
bash -c "$(curl http://get.chooch.ai/imagechat)" -s -k api_key
3. When prompted enter your hostname/IP address of your device. Input the IP address for the device, for example an AWS EC2 Elastic IP or public IP address. If successful, you will have access to the front-end application within 5 to 10 minutes.
Optional step – Quantized Model
A Quantized model allows ImageChat-3 to perform optimally on lower grade GPUs. The available parameters are “yes” or “no” with the default set to “yes.”
Default environment ports
| Frontend | 8000 (Add to inbound access list) |
|---|---|
| Backend API | 7234 (Add to inbound access list) |
| ImageChat API | 80 (Add to inbound access list) |
| Postgres | 5432 |
| Watchtower | 8081 |
| Mongo DB | 27017 |
| Chooch Minio | 9003 9004 |
| Triton Inference | 8062 8063 8064 |
| MilvusDB | 19530 9091 |
4. After gaining access to the interface, set up your username and password to log in.
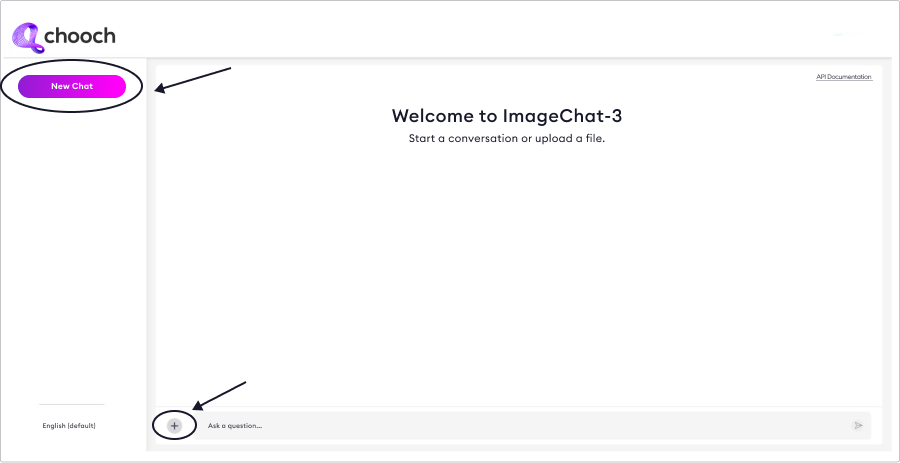
5. Once logged in, you can start using the “New Chat” button or upload a file by clicking the “+” icon.
6. ImageChat setup is now complete. You can begin creating prompts to conduct contextual search of images and documents. ImageChat supports the following file types.
Document file types: .pdf, .docx, .pptx, .csv, .xlsx, .txt
Image file types: .jpg, jpeg, .png
AWS Marketplace installation instructions
If you haven’t already, please complete this form to continue your installation. Please be sure to have your AWS account number accessible when filling out the form.
Completing the form will enable us to add ImageChat-3 AMI into your AWS Account. You will receive a confirmation email when your download is available in your AWS Account.
Once you have confirmation that ImageChat-3 AMI is in your AWS Account, follow the steps below.
Please contact [email protected] with any questions or for technical assistance.
AMI Installation Steps
1. Log in to your AWS console: https://aws.amazon.com/console/
2. Search for “AMI” (Amazon Images).
3. Click “AMI” from the search results.
4. In the dashboard menu bar, make sure that “Private Images” is selected in the filter.
5. Under AMI Name, select the check box next to “Chooch ImageChat-3 Image.”
6. Select “Launch instance from AMI” button.
7. Under the Launch Instance interface, configure the following:
- Create a “Name” for the instance.
- Select your desired “Instance Type.”
- Configure “Security Group Roles” matching installation video instructions (Port 8000, 7234, and 80).
- Configure any other desired parameters.
8. Click “Launch Instance.” Wait time for the instance to spool up will be roughly 10 minutes.
9. Launch desired website and go to http://:8000 to log into the space.
10. Create your username and add your Chooch API Key to complete stand-up of the space.
How to uninstall ImageChat from your local device
If needed, follow these steps to uninstall ImageChat.
1. Remove containers and volumes.
docker compose down -v --remove-orphans
2. Delete persistent data folder.
sudo rm -rf chooch_imagechat/
Technical support
If you have any additional questions, please contact [email protected].